Saya rasa saya sudah menemukan sesuatu yang memberikan apa yang saya cari. Di kertas A5, saya menggunakan Binding Gutter (Tepi Jilid) 45mm, memilih Outer Gutter (Tepi Luar), lalu memilih Marks & Guides (Tanda & Garis Pandu), khususnya Grid (Graph Paper) (Grid (Kertas Graf)). Di UI, saya memilih warna, dan saya mengubah ketebalan garis pembagian minor menjadi nol.
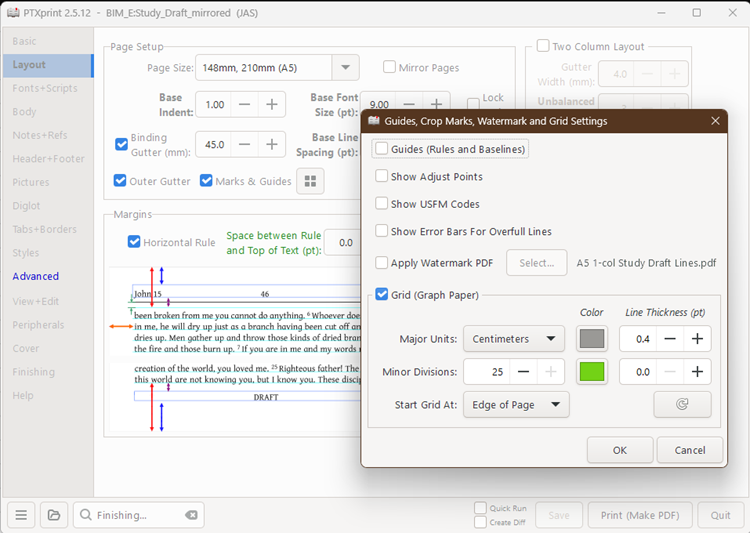
Saya kemudian menyalin seluruh fungsi "\doGraphPaper" dari file "ptx-cropmarks.tex" dan menempelkannya ke field "ptxprint-mods.tex". Saya kemudian memodifikasinya agar berfungsi untuk saya.
Saya mematikan garis vertikal dengan pada dasarnya membatalkannya, dan kemudian saya mengubah garis horizontal menjadi seperti yang saya inginkan. Saya menyelaraskan garis atas dengan "Horizontal Rule" (Garis Horizontal) (dari Margins pada tab Layout di UI) dengan mengubah offset atas. Karena saya ingin menggunakan tepi luar, saya menggunakan strategi "\ifodd\pageno...\else" untuk mengatur garis untuk satu sisi dan sisi lainnya secara terpisah. Properti "\GraphPaperY" dapat didefinisikan untuk mengubah jarak antara garis. Sekali lagi, saya berdasarkan angka-angka pada penggunaan kertas A5.
Berikut adalah kode yang saya tambahkan ke "ptxprint-mods.tex":
\def\doGraphPaper{%
\bgroup\topskip=0pt\baselineskip=0pt\parindent=0pt\everypar{}\relax
\def\GraphPaperYoffset{1.81cm}
%vertical rules
%
\def\th@sgprule{Major}%
\def\gp@type{GraphPaper}%
\count255=\GraphPaperMajorDiv
\dimen1=\GraphPaperX
\dimen2=\pdfpagewidth
\dimen3=\pdfpageheight
\dimen0=\GraphPaperYoffset
% \advance\dimen3 by -\dimen0
\advance\dimen3 by -50\dimen0
\advance\dimen2 by -2\dimen1
\advance\dimen2 by -\GraphPaperXoffset
\setbox0=\hbox{\kern\GraphPaperXoffset\gp@vrule}%
\gp@step
\gp@vrules
\vbox to 0pt{\hbox to 0pt{\unhbox 0\gp@vrule\hss}\vss}%
% Horizontal rules
%
\def\th@sgprule{Major}%
\count255=\GraphPaperMajorDiv
\def\GraphPaperY{0.3535mm}% For less space between lines
\dimen1=\GraphPaperY
\dimen2=\pdfpageheight
\advance\dimen2 by -\dimen1
\ifodd\pageno
\dimen3=.5\pdfpagewidth
\def\GraphPaperXoffset{9.5cm}% Beginning of line
\dimen0=\GraphPaperXoffset
\advance\dimen3 by -0.325\dimen0 % leave 1cm between end of line and right margin
\else
\dimen3=\pdfpagewidth
\def\GraphPaperXoffset{1.0cm}
\dimen0=\GraphPaperXoffset
\advance\dimen3 by -10.5\dimen0 % leave 1cm between end of line and inside margin
\fi
\setbox0=\vbox{\kern\GraphPaperYoffset\gp@hrule}%
\gp@step
\gp@hrules
\vbox to 0pt{\unvbox 0\vss}%
\cp@p\global\let\l@stgprule\empty
\egroup
}
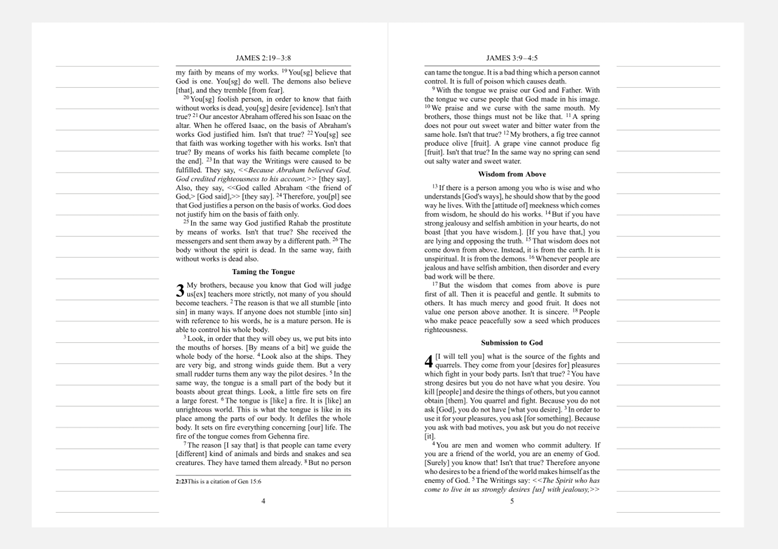
Saya yakin ini bisa dilakukan dengan lebih elegan! Saya sedang mencoba belajar sambil berjalan dan menggunakan apa yang sudah ada. Tapi ini adalah tata letak yang dihasilkan darinya:
I think I worked something out that gives me what I'm looking for. On A5 paper, I used a Binding Gutter of 45mm, selected Outer Gutter, and then selected the Marks & Guides, then specifically the Grid (Graph Paper). In the UI, I selected the color, and I turned the minor divisions line thickness to zero.
I then copied the entire "\doGraphPaper" function from the "ptx-cropmarks.tex" file and pasted it into the "ptxprint-mods.tex" field. I then modified it to make it work for me.
I turned the vertical lines off by basically undoing them, and then I changed the horizontal lines into what I wanted them to be. I lined up the top line with the "Horizontal Rule" (from the UI's Margins on the Layout tab) by changing the top offset. Because I wanted to use the outer gutter, I used an "\ifodd\pageno...\else" strategy to set the lines for one side and the other separately. The "\GraphPaperY" property can be defined to change the space between the lines. Again, I based the numbers on using A5 paper.
Here's the code I added into "ptxprint-mods.tex":
\def\doGraphPaper{%
\bgroup\topskip=0pt\baselineskip=0pt\parindent=0pt\everypar{}\relax
\def\GraphPaperYoffset{1.81cm}
%vertical rules
%
\def\th@sgprule{Major}%
\def\gp@type{GraphPaper}%
\count255=\GraphPaperMajorDiv
\dimen1=\GraphPaperX
\dimen2=\pdfpagewidth
\dimen3=\pdfpageheight
\dimen0=\GraphPaperYoffset
% \advance\dimen3 by -\dimen0
\advance\dimen3 by -50\dimen0
\advance\dimen2 by -2\dimen1
\advance\dimen2 by -\GraphPaperXoffset
\setbox0=\hbox{\kern\GraphPaperXoffset\gp@vrule}%
\gp@step
\gp@vrules
\vbox to 0pt{\hbox to 0pt{\unhbox 0\gp@vrule\hss}\vss}%
% Horizontal rules
%
\def\th@sgprule{Major}%
\count255=\GraphPaperMajorDiv
\def\GraphPaperY{0.3535mm}% For less space between lines
\dimen1=\GraphPaperY
\dimen2=\pdfpageheight
\advance\dimen2 by -\dimen1
\ifodd\pageno
\dimen3=.5\pdfpagewidth
\def\GraphPaperXoffset{9.5cm}% Beginning of line
\dimen0=\GraphPaperXoffset
\advance\dimen3 by -0.325\dimen0 % leave 1cm between end of line and right margin
\else
\dimen3=\pdfpagewidth
\def\GraphPaperXoffset{1.0cm}
\dimen0=\GraphPaperXoffset
\advance\dimen3 by -10.5\dimen0 % leave 1cm between end of line and inside margin
\fi
\setbox0=\vbox{\kern\GraphPaperYoffset\gp@hrule}%
\gp@step
\gp@hrules
\vbox to 0pt{\unvbox 0\vss}%
\cp@p\global\let\l@stgprule\empty
\egroup
}
I'm sure it could be done more elegantly! I was trying to learn on the fly and use what was already there. But this is the layout that came from it:
Diterjemahkan secara otomatis dari English